Week 11: Molding & Casting
In this eleventh week of Fab Academy, there are two types of assigments. The individual assigment is to design a 3D mould around the stock and tooling that you'll be using, machine it, and use it to cast parts.
The group assigment is to review the safety data sheets for each of your molding and casting materials, then make and compare test casts with each of them. Further learning from this week is given below:
- Review the safety data sheets for each of your molding and casting materials
- Make and compare test casts with each of them
- Design a 3D mould around the stock and tooling that you'll be using, mill it (rough cut + (at least) three-axis finish cut), and use it to cast parts.
- Review the safety data sheets for each of your molding and casting materials, then made and compared test casts with each of them
- Explain the mistakes that I had made and how I corrected it
- Include hero shots of the mould
- Show how you made your mould and cast the parts.
- Document how you designed your 3D mould and created your rough and finish toolpaths for machining, including machine settings.
The following are the softwares that I have used for learning various operations:
- Autodesk Fusion 360 : Designing, Rendering & CAM
- MIT Mods : Machine Management
Even though several rapid prototyping technologies are available, they are very inefficient in replicating similar designs. Molding and casting is the best way to replicate similar products in large scale and it plays a huge role in small scale industries to huge automobile industries. Even engines are made using casting.
| |
|
|---|---|
| Wednesday | Prof. Neil's class on Molding & Casting |
| Thursday | Group assigment |
| Friday | Absent |
| Saturday | Research |
| Sunday | Research |
| Monday | Designing the mold and milling |
| Tuesday | Casting and trying different casting materials |
Molding:
It is the process of manufacturing by shaping liquid or pliable raw material using a rigid frame called a mold or matrix. This itself may have been made using a pattern or model of the final object. Moulding is a commonly used manufacturing process that used for multimodelling or long life processes.A mold or mould is a hollowed-out block that is filled with a liquid or pliable material such as plastic, glass, metal, or ceramic raw material. The liquid hardens or sets inside the mold, adopting its shape. A mold is the counterpart to a cast. The very common bi-valve molding process uses two molds, one for each half of the object.
Casting:
It is the opposite manufacturing process, in which a liquid material is usually poured into a mold, which contains a hollow cavity of the desired shape, and then, when solidified, is ejected or broken out of the mold to complete the process. Casting is a manufacturing process in which a liquid material is usually poured into a mould, which contains a hollow cavity of the desired shape, and then allowed to solidify. The solidified part is also known as a casting, which is ejected or broken out of the mould to complete the process. Casting materials are usually metals or various cold setting materials that cure after mixing two or more components together; examples are epoxy, concrete, plaster and clay. Casting is most often used for making complex shapes that would be otherwise difficult or uneconomical to make by other methods
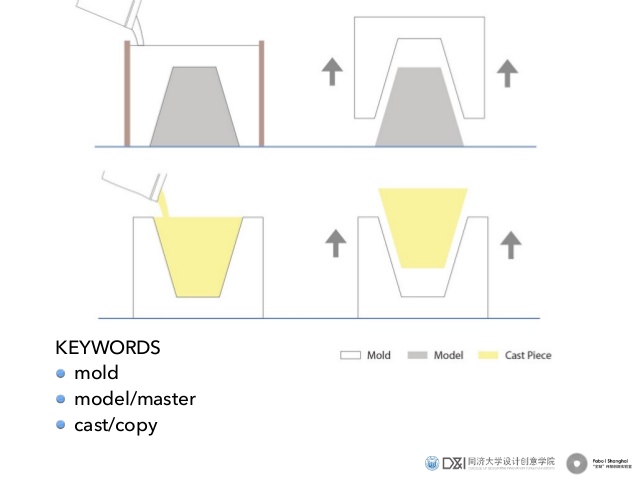
Positive and Negetive mold
A positive mold is an exact replica of the desired object . It directly applicable if we are working on composits ,vaccum forming , sheet metals etc. Whereas the negative mold is usually used for casting liquids like liquid plastic ,molten metal ,gypsum ,cement etc
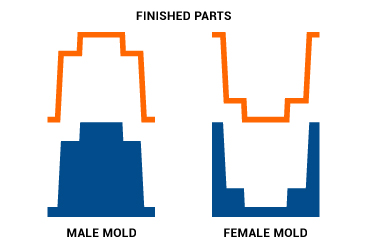
Male and Female Mold for injection molding
Male parts are formed on the mold and must be pulled off upon removal. Female parts are formed in the mold and must be taken out upon removal. Whether male or female, the mold can be either above or below the sheet during forming.
| |
|
|---|---|
| Mold dimensions are inside the part, and can be precisely controlled. Non-Mold surface dimensions are effected by material thickness. | Mold dimensions are outside the part, and can be precisely controlled. |
| Higher gloss on outer surface; No mold marks on outer surface; Sharp exterior detail and definition is not possible; Part exterior cannot be textured by the mold surface; textured sheet stock can create desired finished part texture; draft required on sides to facilitate part removal from mold; in general, parts have a more rounded appearance, with soft radii and limited surface detail. | Higher gloss on inner surface; mold marks may appear on outer surface, plug assist marks may appear on inner surface; sharp exterior detail is possible; finished part texture can be created by texturing the mold surface; textured sheet stock will not create desired finished part texture; no draft required in most cases; in general, parts have crisp exterior detail, and demonstrate cosmetic features usually associated with injection molding. |
| Corners of finished part may be thicker; pulling a bubble to pre-stretch material prior to contact with the mold can improve material distribution. | Bottom corners may be thin; use of a pre-forming bubble, in conjunction with a heated plug assist can improve material distribution. |
| Least expensive form of tooling. Lends itself to multiple cavity applications. | More expensive than male tooling. Approximately one tenth the cost of injection molding tooling for a comparable part. |
Types of Molding
Rotational molding: Rotational Molding Rotational Molding, also called rotomolding, is a manufacturing process for producing large hollow parts and products by placing a powder or liquid resin into a metal mold and rotating it in an oven until the resin coats the inside of the mold. The constant rotation of the mold creates centrifugal force forming even-walled products. Once the mold cools, the hardened plastic is removed from the mold.
Injection molding: Injection molding is the process of making custom plastic parts by injecting molten plastic material at high pressure into a metal mold. Just like other forms of plastic molding, after the molten plastic is injected into the mold, the mold is cooled and opened to reveal a solid plastic part.
Blow molding: Blow molding is a method of making hollow, thin-walled, custom plastic parts. It is primarily used for making products with a uniform wall thickness and where the shape is important. The process is based upon the same principle as glass blowing.
Compression molding: Compression molding is done exactly like the name suggests. A heated plastic material is placed into a heated mold and then pressed into a specific shape. Usually, the plastic comes in sheets, but can also be in bulk. Once the plastic is compressed into the right shape, the heating process ensures that the plastic retains maximum strength.
Extrusion molding: Extrusion molding is similar to injection molding except that a long continuous shape is produced. Another difference in extrusion molding is that the process uses a “die” not a “mold.” Extruded parts are made by squeezing hot raw material through a custom die. A simplistic visualization would be like squeezing Play Doh through a shaped hole.
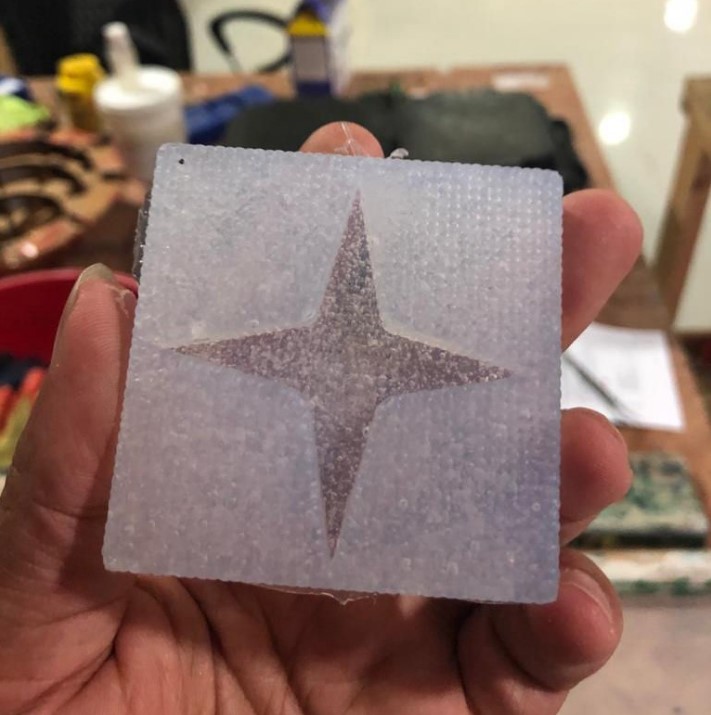
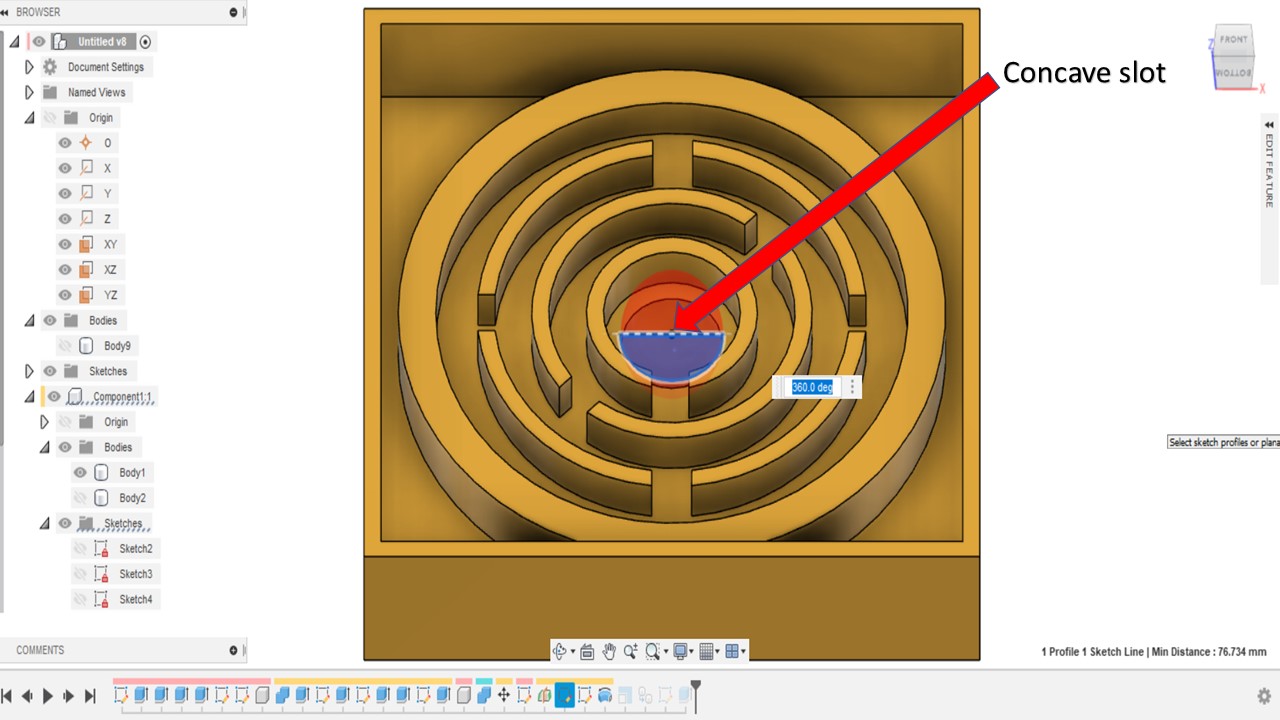
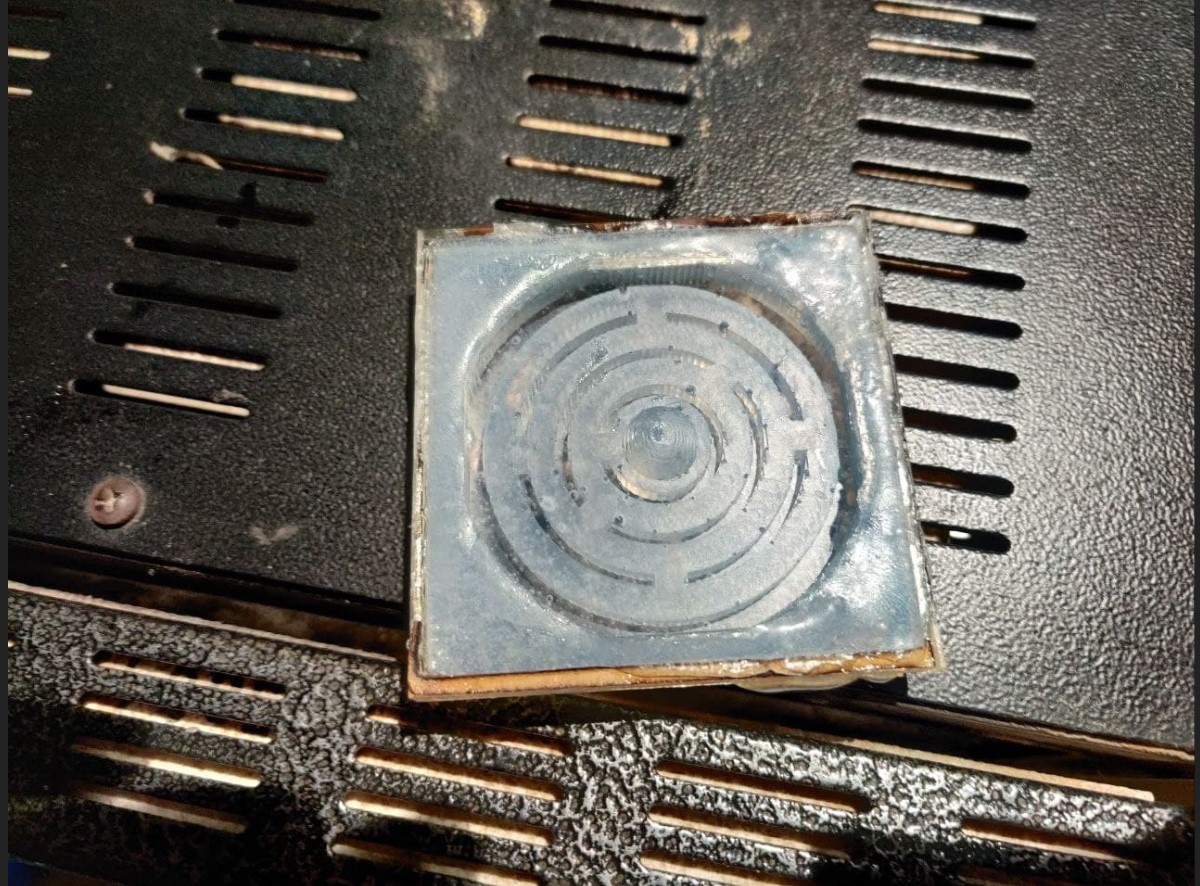
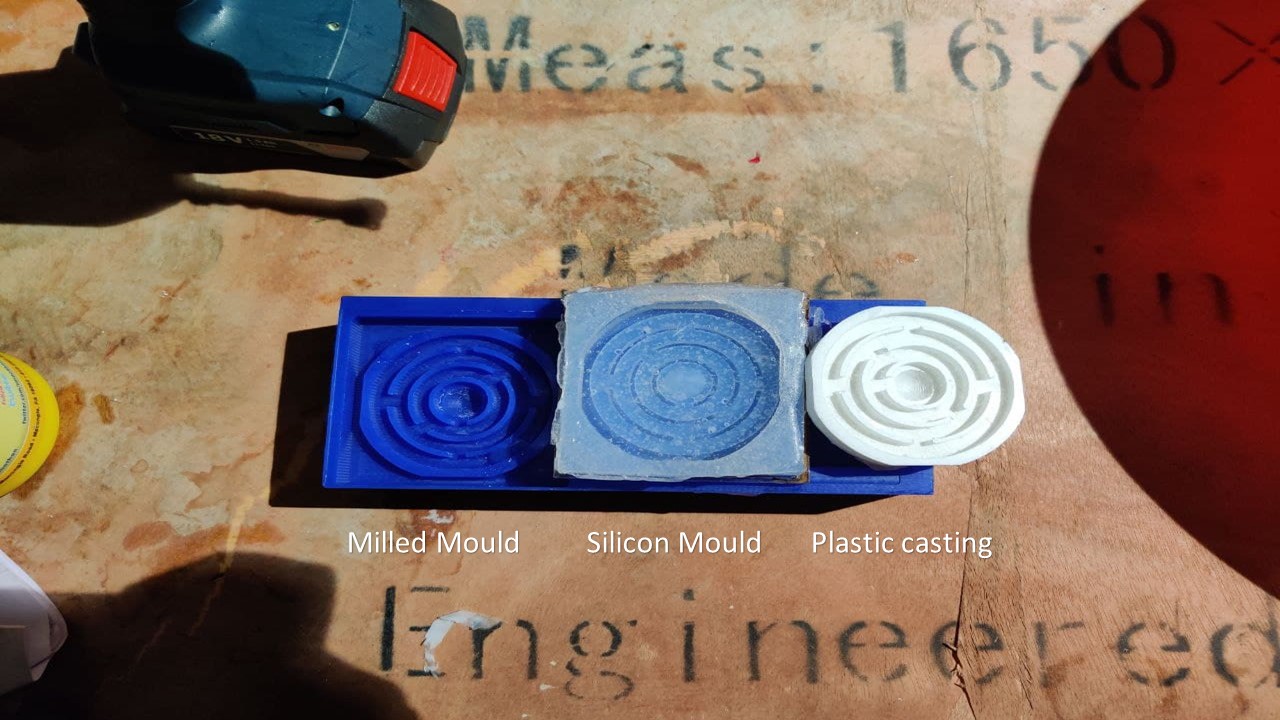
As I had discussed earlier, for this week I am going to make a circular maze. I had voluntarily chose this one since I am already late for this week and I have to make something simple yet meets the purpose. For the maze I had provided 4.4mm gap in between the maze while the gap is 4.671mm for the bead to pass through. The diameter of the outer circle is 64mm while the smallest circle is 16mm in diameter. The block of wax I had selected has a dimension of 76mm * 180 mm * 40mm (L*W*H) and I had created a recess with dimensions 72mm *72 mm * 13.6 mm (L*W*H). I had designed the mold with recess so that it will help me to easily cast the mold.
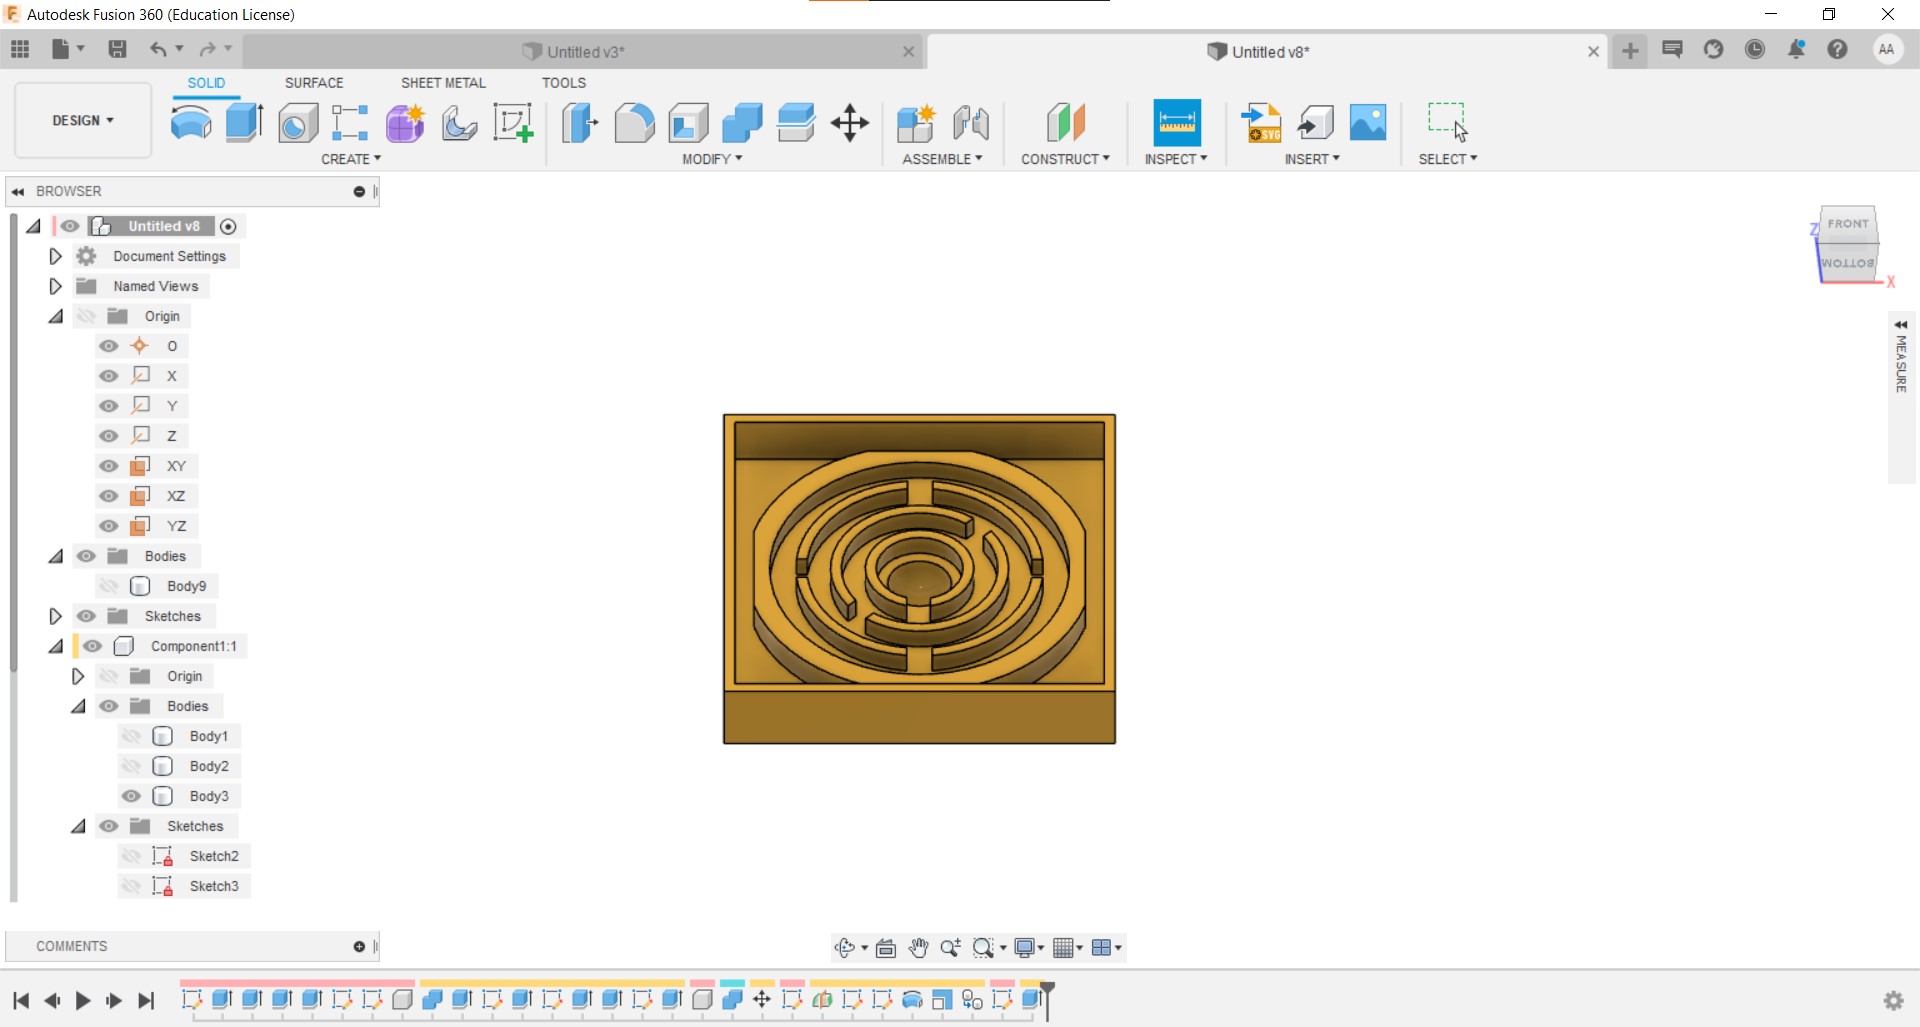
The idea was to machine the positive of the mold (The actual product you want) and then cast the mold using silicon rubber. Since the applicaion of a 3 axis milling is required, I had create a concave slot at center of the maze. I had created a semicircle in the midplane and use revolve function to create it.
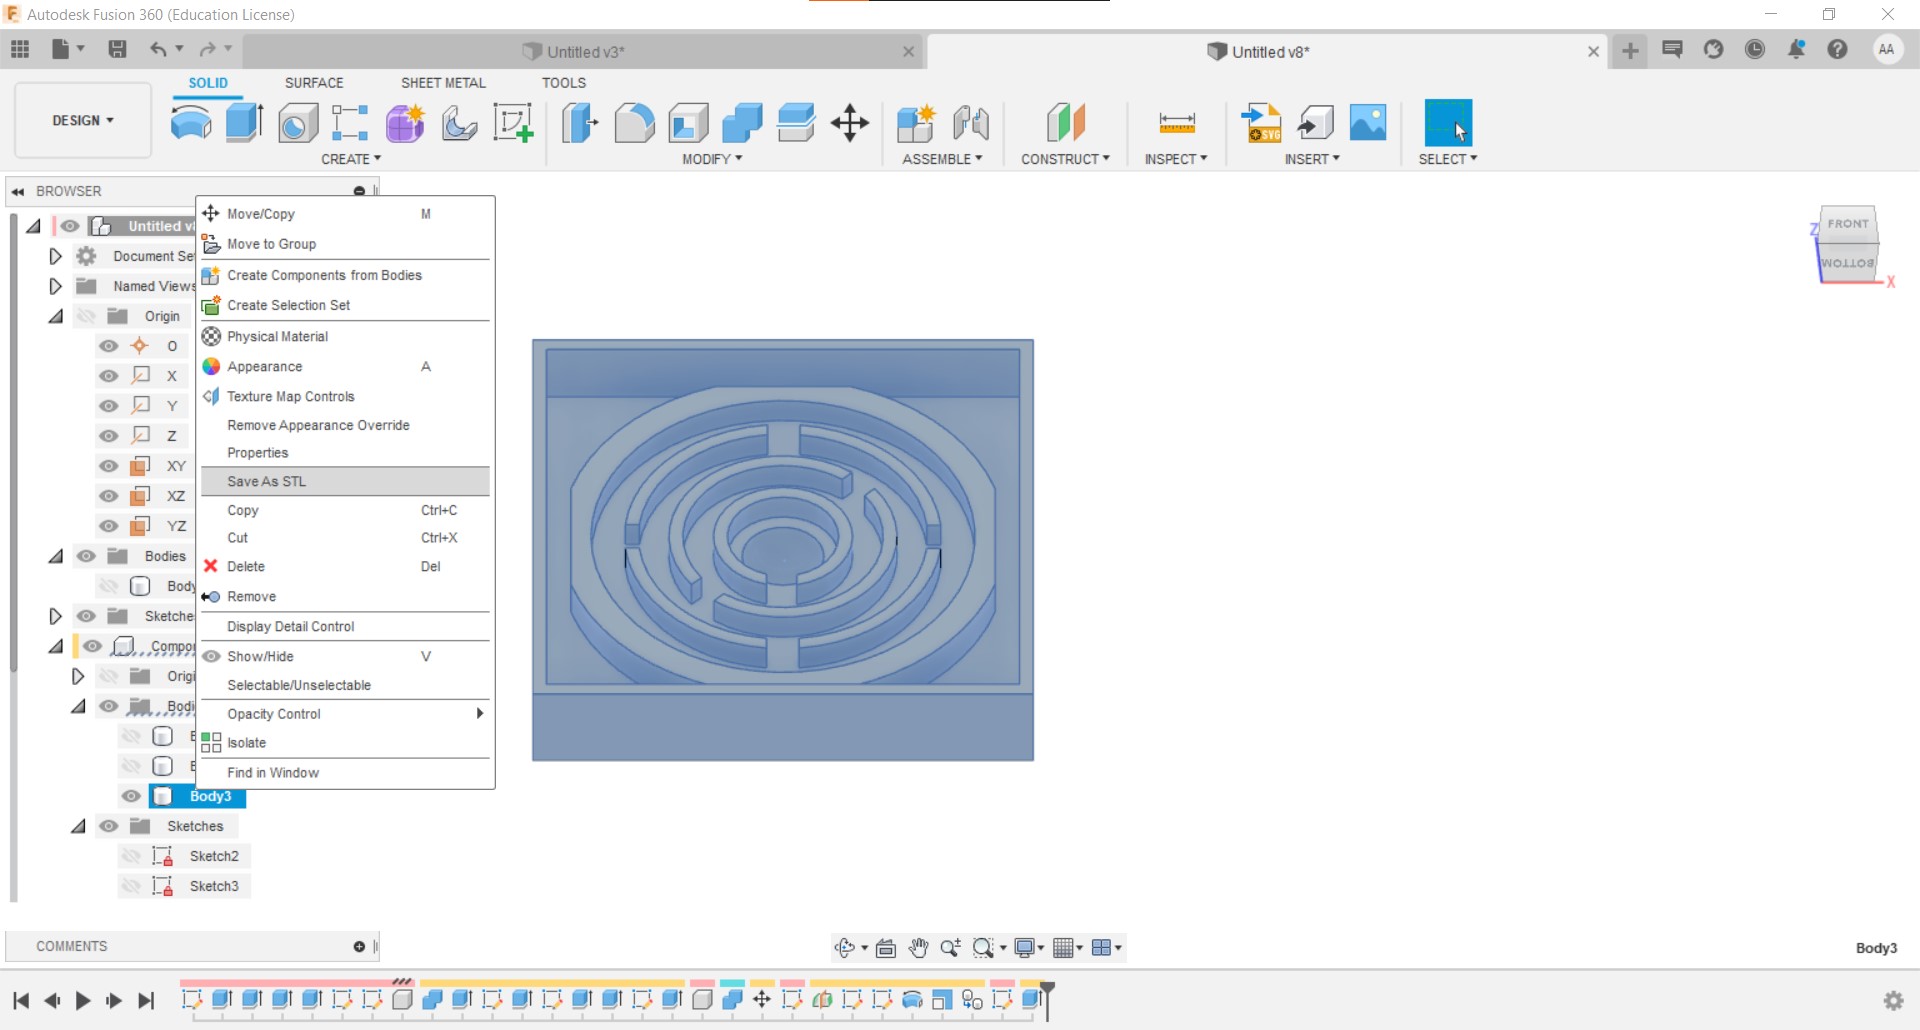
After the model is ready, the next step is to export it as .STL. For that you need to right click the body and save as STL.
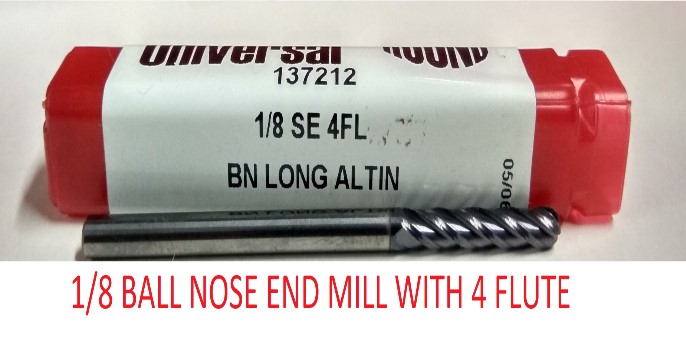
For milling process the I am using "1/8 inch" ball end 4 flute bit and I had attached it to the Roland Molling machine as usual. You can learn more about setting up the machine from Week 6: Electronics Design.
Now you need to take the wax block and attach a double sided tape to the back side. Then you need to stick the wax block to the milling machine bed.
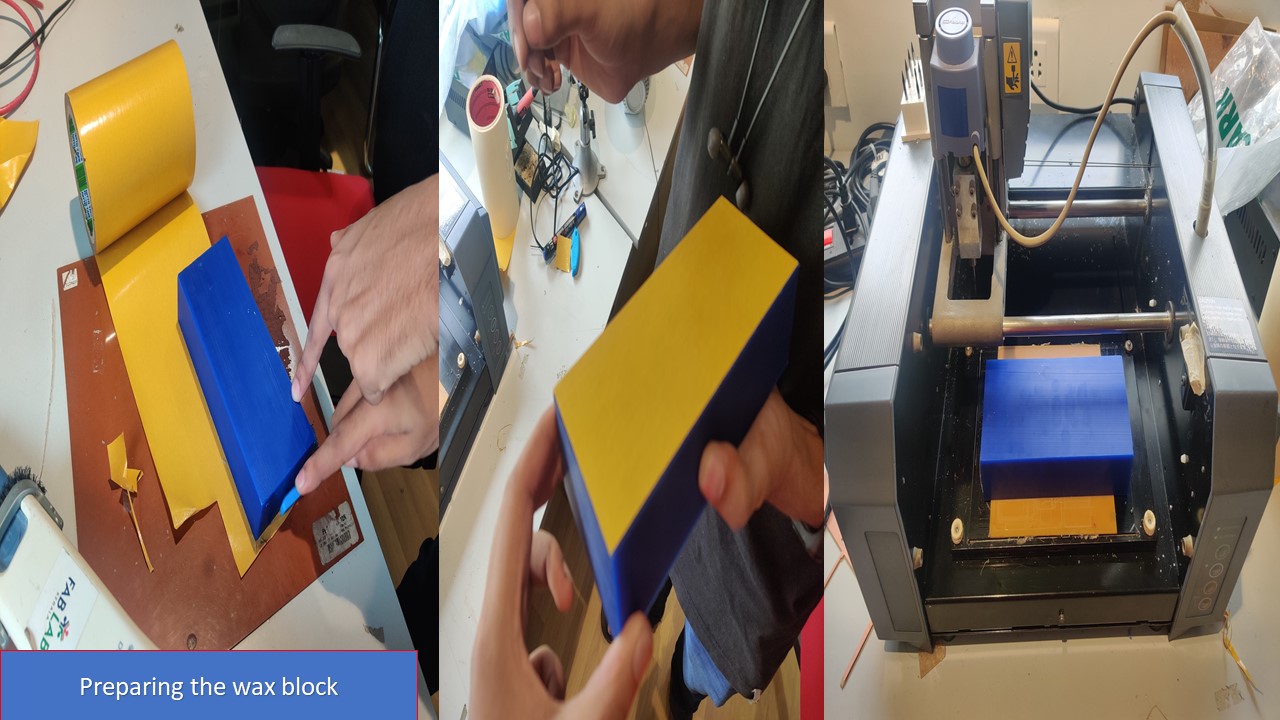
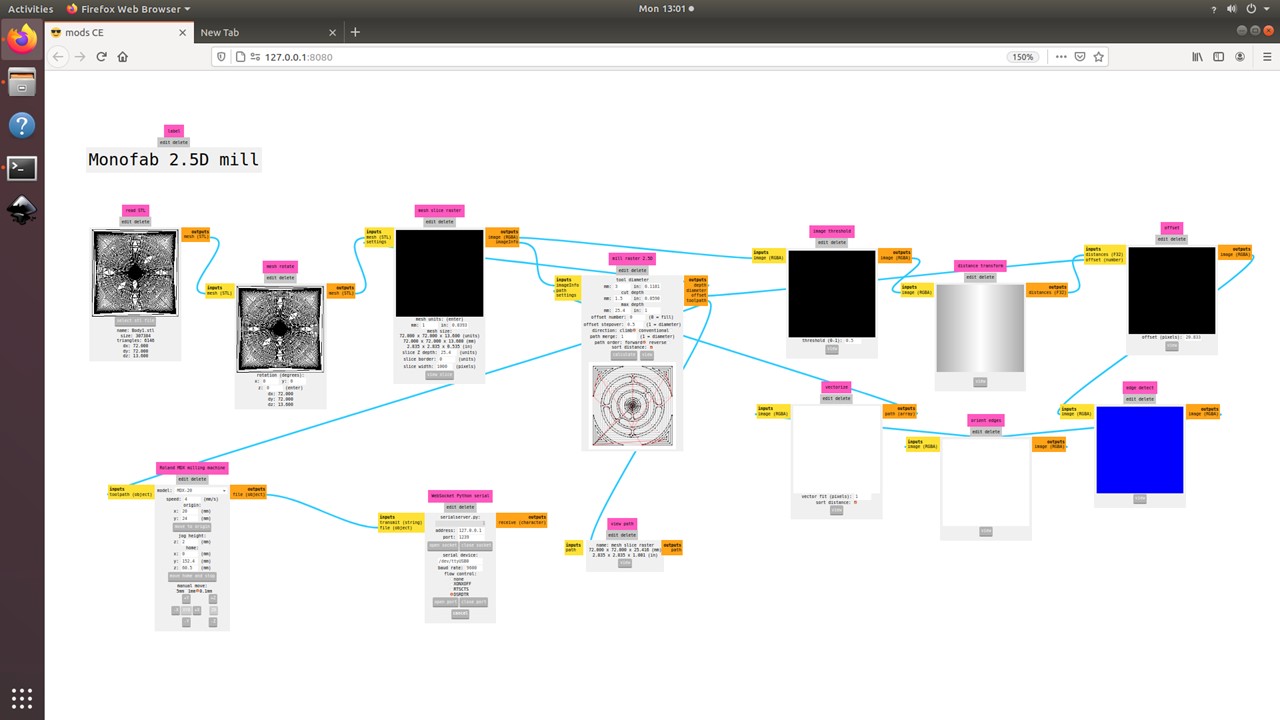
The next step is to fix the Z height and set the origin. After that you need to go MIT Mods. First you need to select 2.5D STL MDX Mill option.
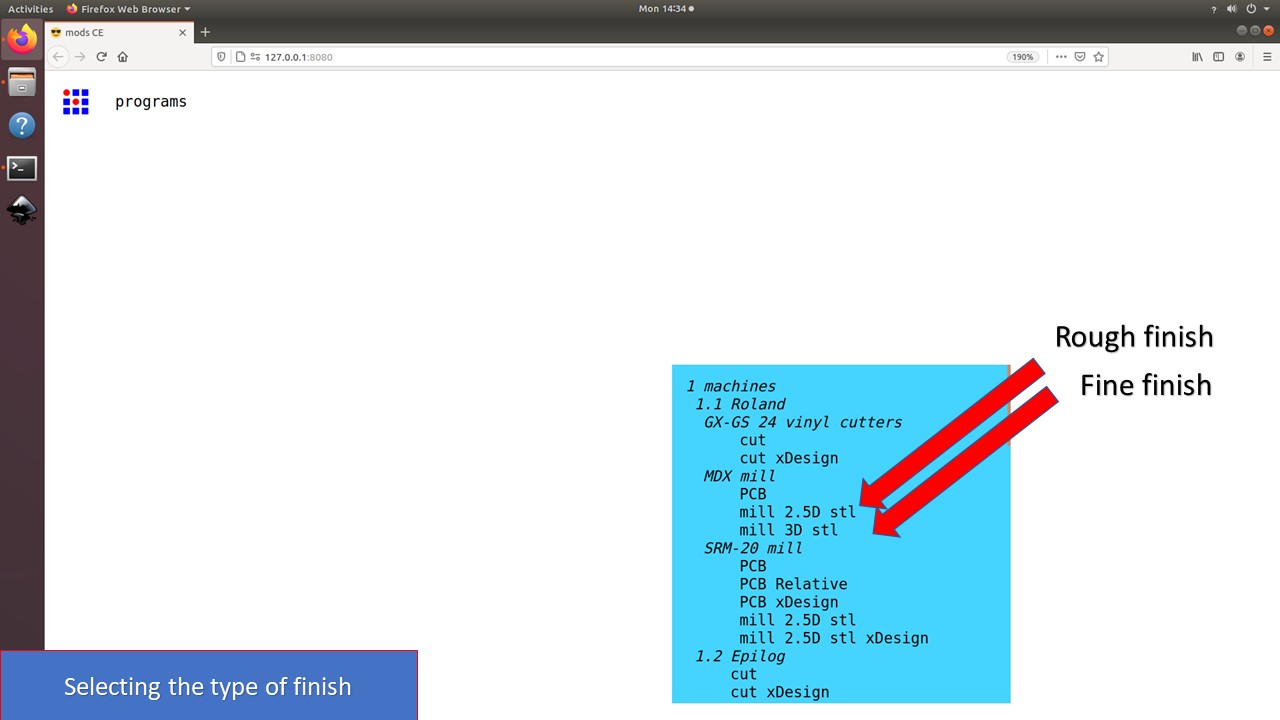
Now you need to select the STL file of the object to be milled and select tool diameter as 3mm and cut depth as 1.5mm. Now as usual you need to send the file to Modela
The milling process is shown below:
Similar process is repeated by selecting the 3D STL option from Mods and select the same STL file. The fine/smooth finish is conducted using the same bit but the process is different.
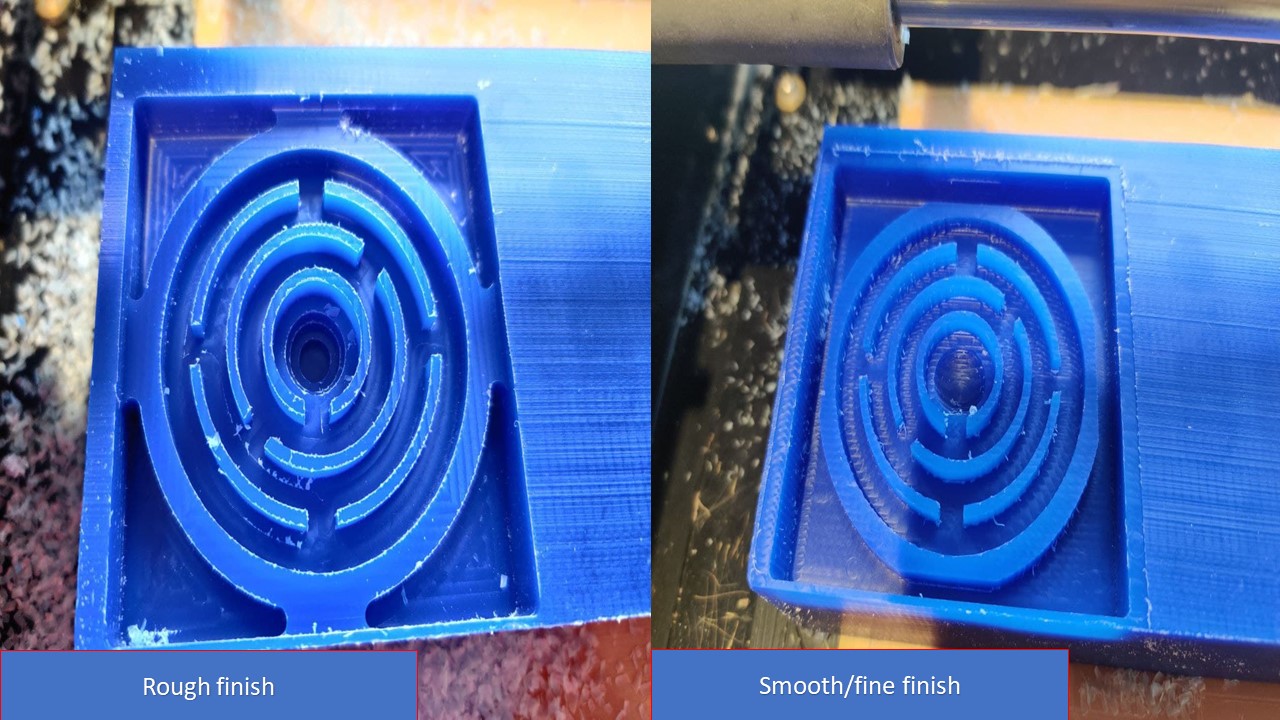
The below image shows the difference between the rough and smooth milling operation. Especially the concave slot was milled as steps in the rough mill but the slot became smooth in smooth mill operation.
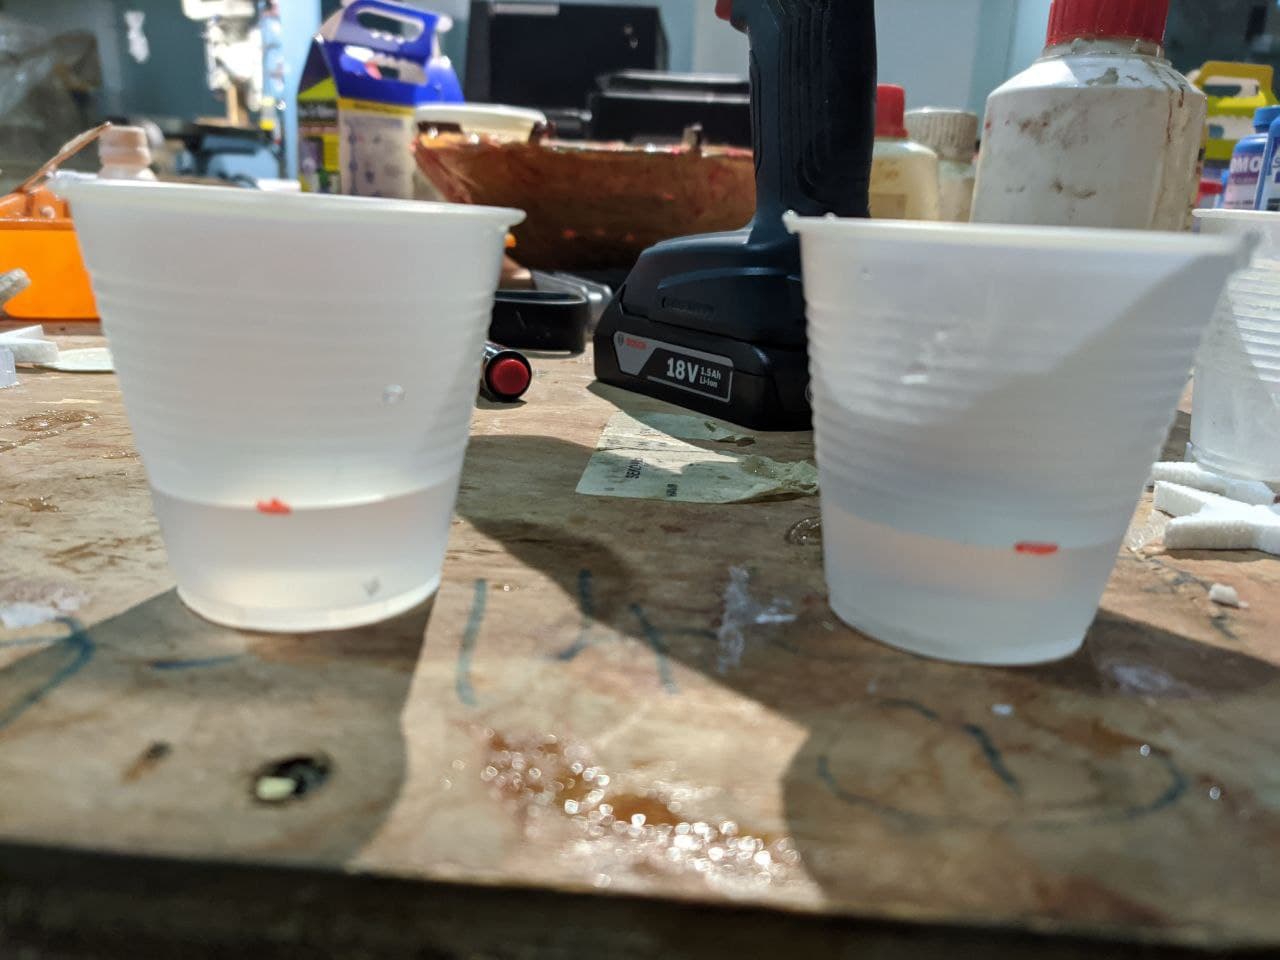
The first step is to take the milled was mold and fill it with water. You need to fill the water to a level that it doesn't spill over the mould. After filling it with water you need to pour the filled water from the mold to a glass. This process is conducted to find the volume of the resin required.
Now you need to split the water equally in 2 glassess and mark the level of water using a marker. After this you can remove the water from the glass and may use a air blower to remove the remaining water left in the glass.
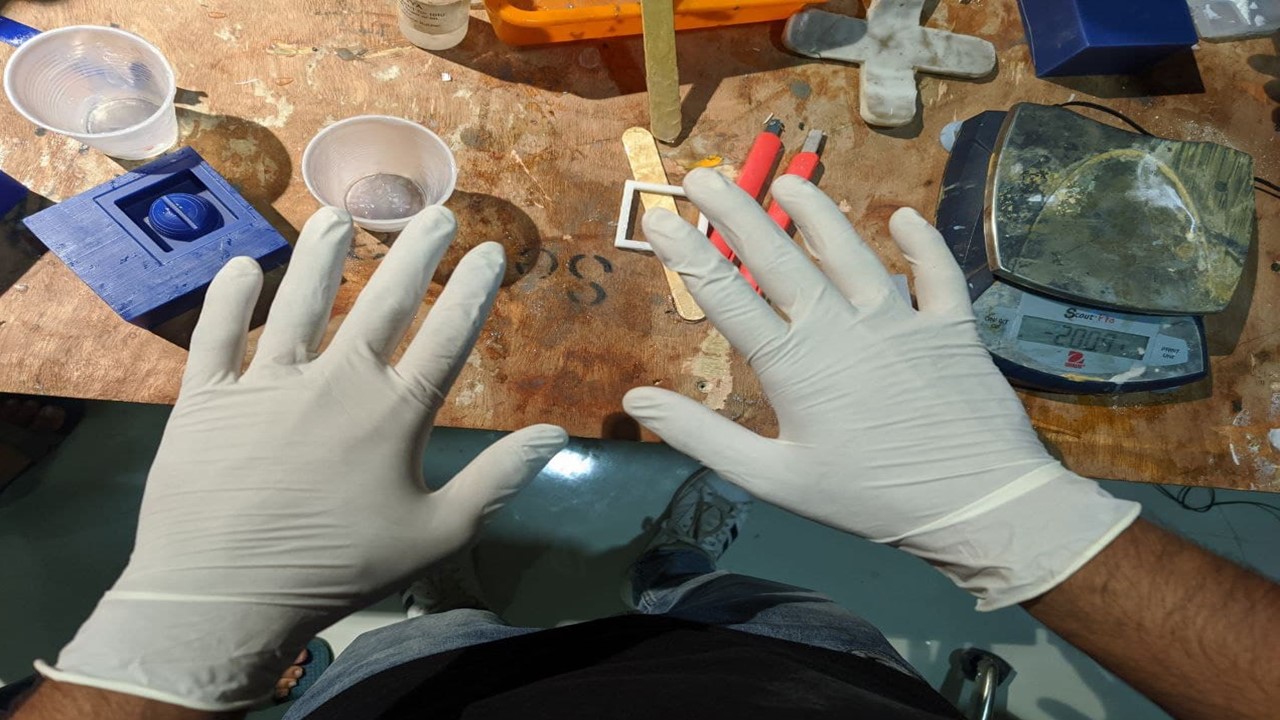
Before going to the next step i.e. messing with the resin you need to make your hands safe using gloves and safety glassess.
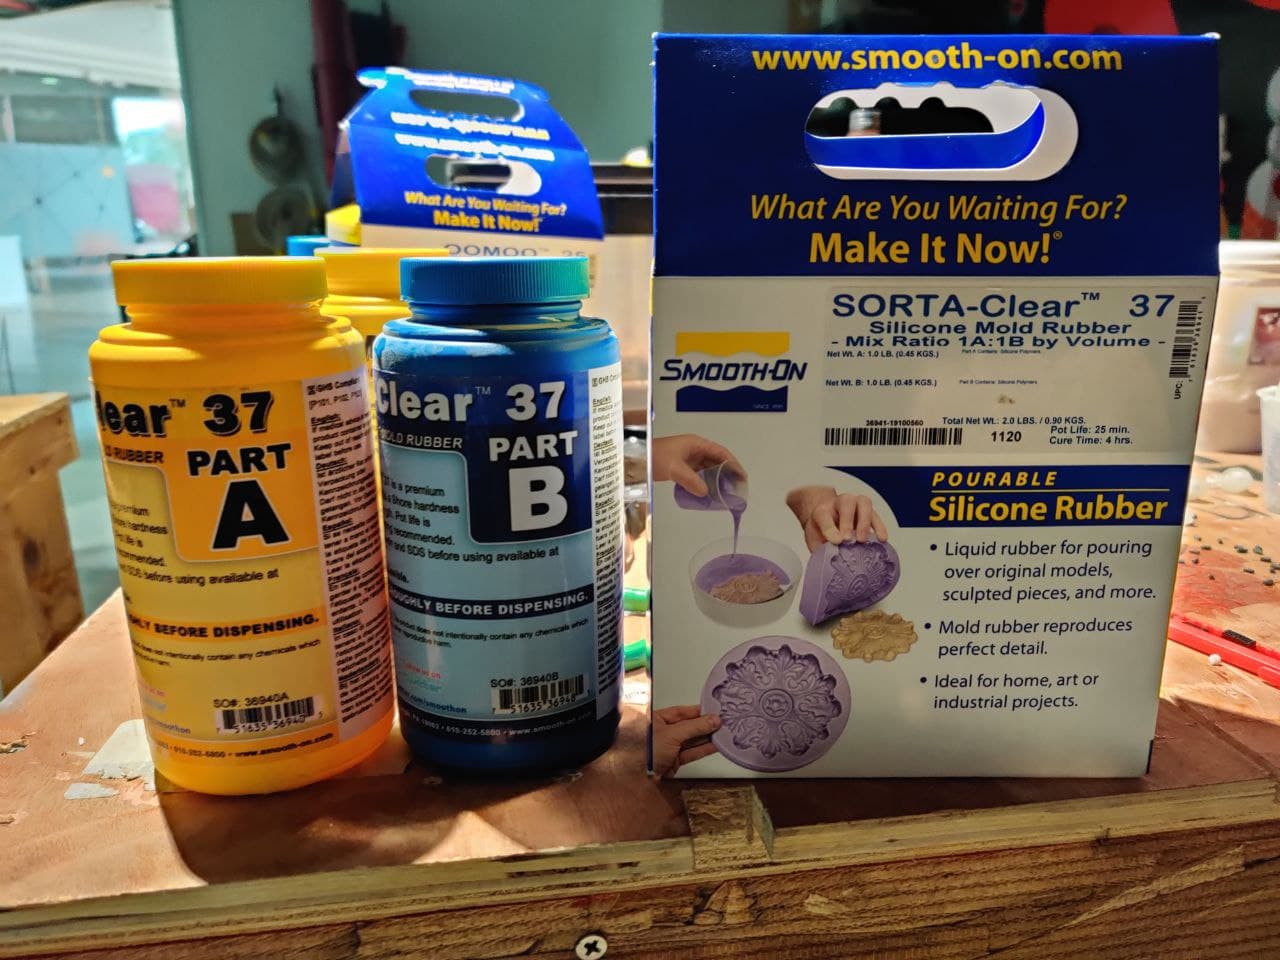
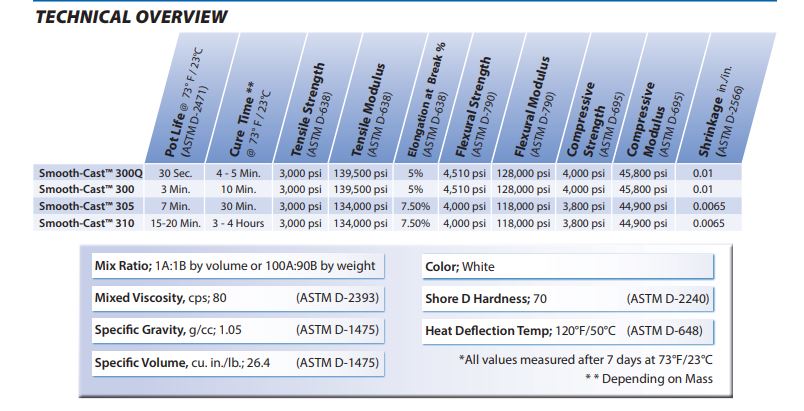
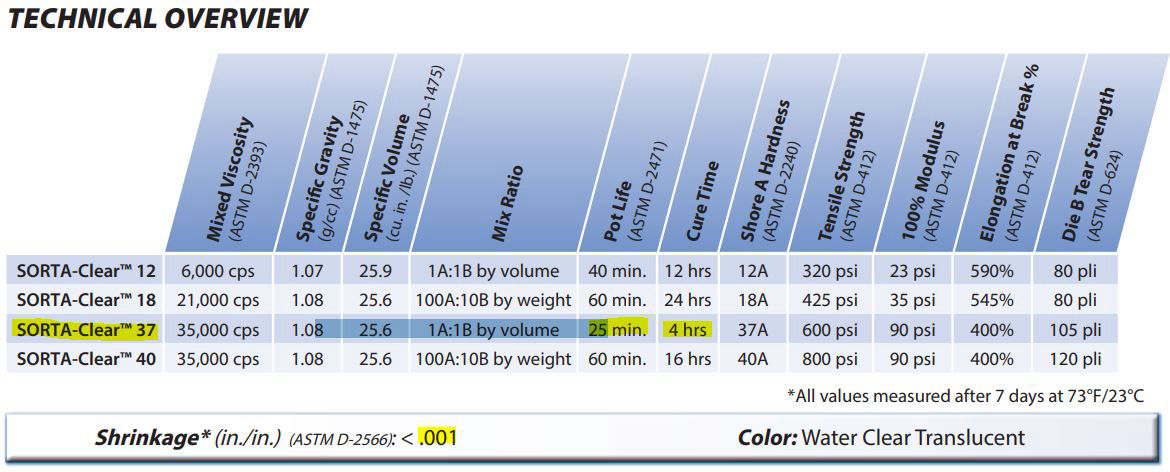
For the resin selection, I had opted Smooth-On Sorta Clear 37 Silicon mold rubber for making the mold. Sorta Clear 37 has Shore 37A hardness and features high tensile and tear strength. This product also offers the convenience of a 1A:1B by volume mix ratio. t's silicones are ideal for making prototype, jewelry or other molds of any configuration where model visibility is important (i.e. extracting a model from the mold via cutting). Materials such as urethane, epoxy or polyester resins can then be cast into SORTA-Clear™ silicone without application of a release agent. Other materials such as wax and low melt metal alloys can also be cast into SORTA-Clear™. SORTA-Clear™ can be pigmented with SILC Pig™ silicone pigments.
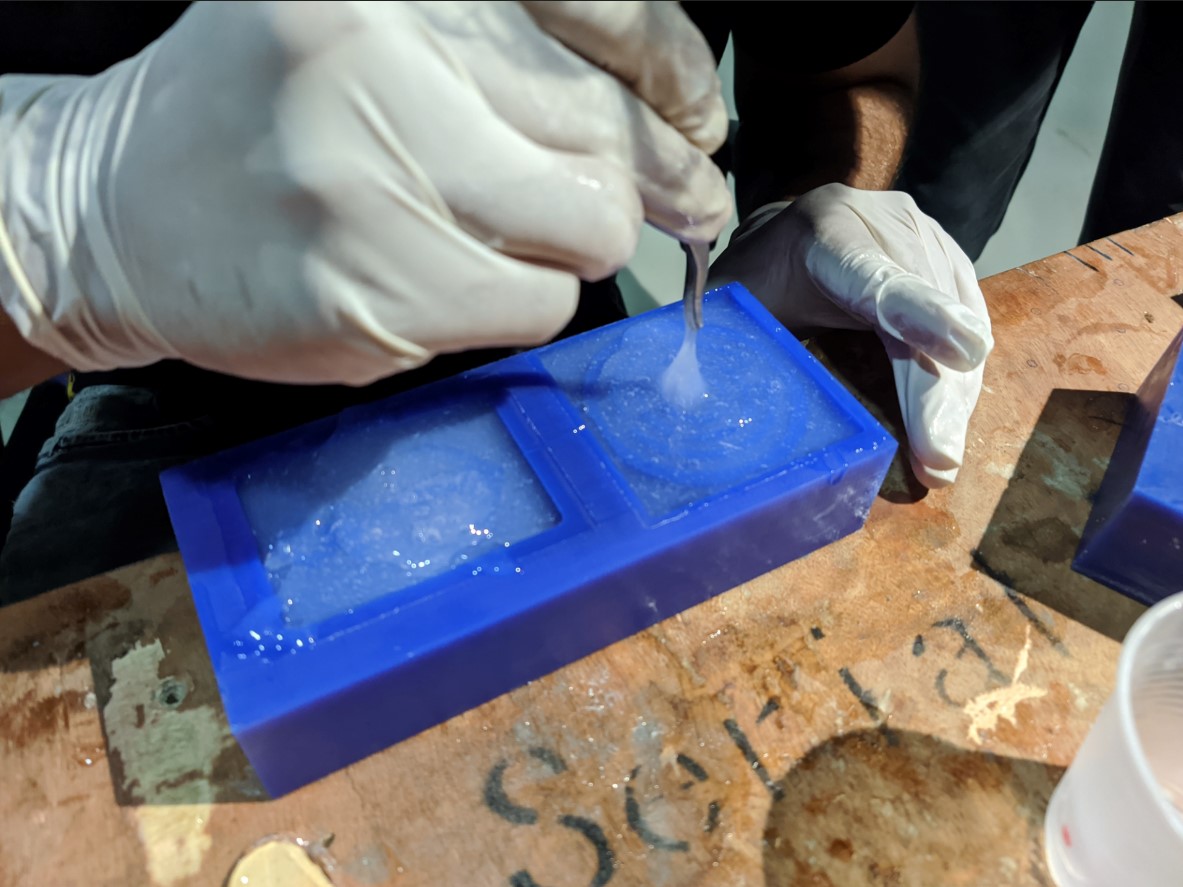
The next step is to pour the resin and the hardner to the glass marked with the required levels. The ratio must be 1A:1B by volume mix ratio. After that you need to pour either Part A/B to either glass and mix it thoroughly.
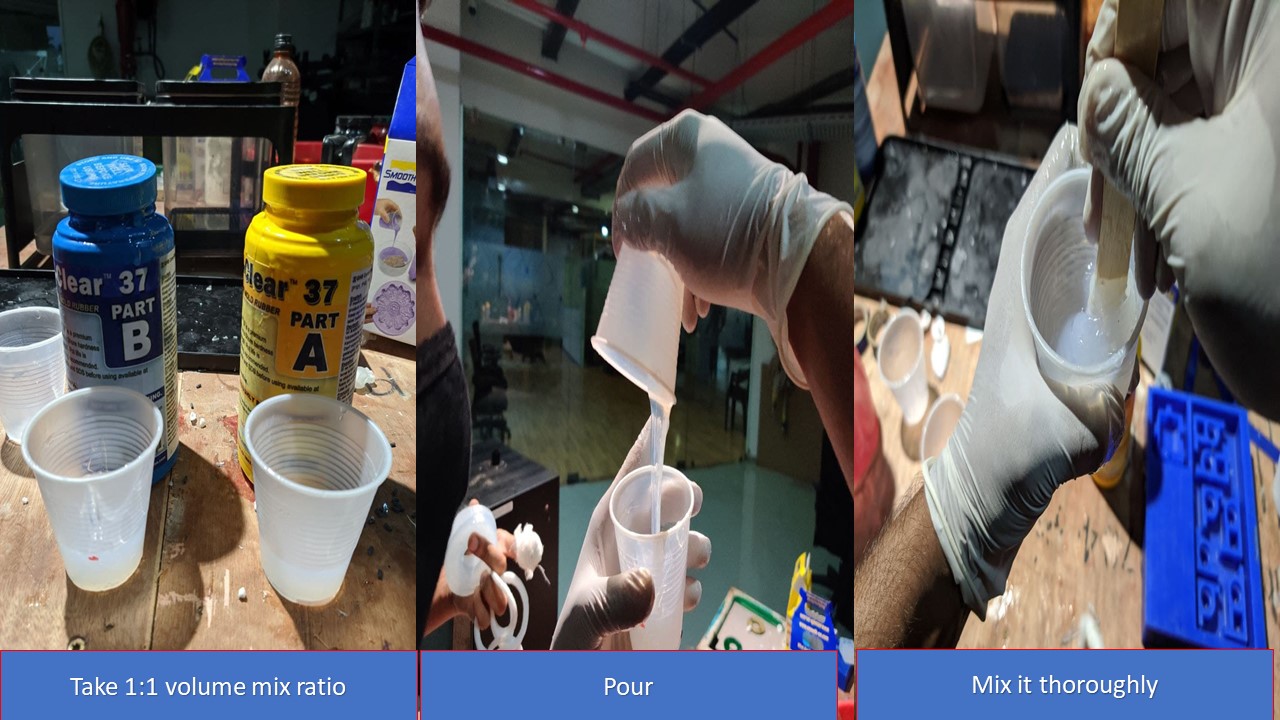
To mix to thoroughly I had used a drilling machine and it went well.
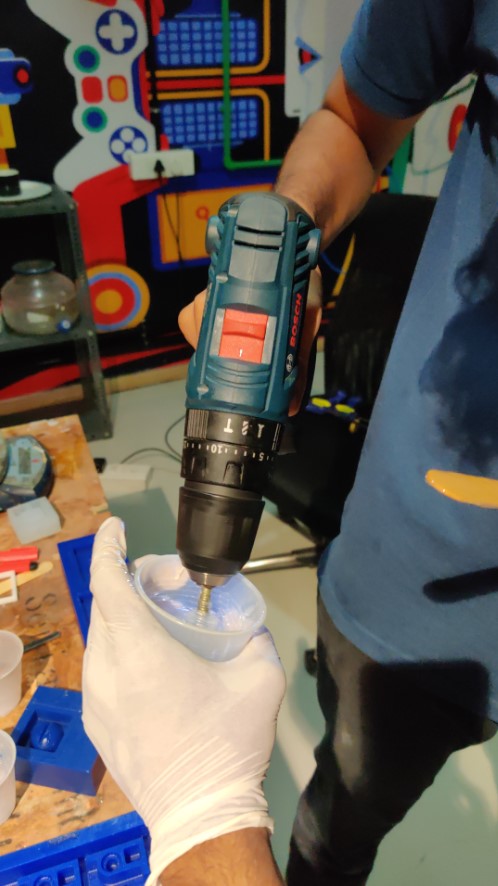
The last step is to pour the mix into the mold and leave it for curing. This mix normally takes 6 hours to get cured and you can check intermittently to ensure that the mold get solidified.
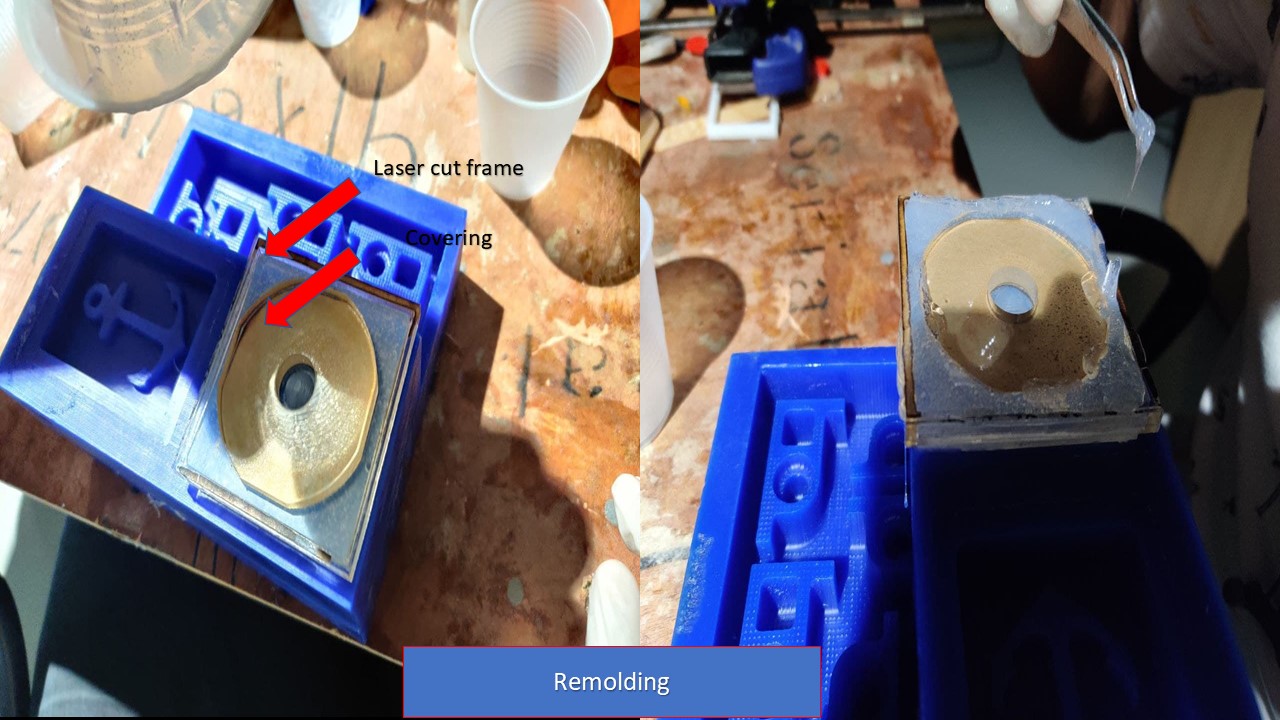
Errors made : Design and molding
Atlast the moment of truth arrived, I expected the mold to be good and it was made as expected. Here comes the twist, since there is insufficient height for the base and if I cast using this mould there won't be a base for the cast. Inorder to prevent that, with the help of my friend Saheen, I had laser cutted an arcylic sheet which I can use to increase the height of the mold while covering the center portion using another acrylic piece.
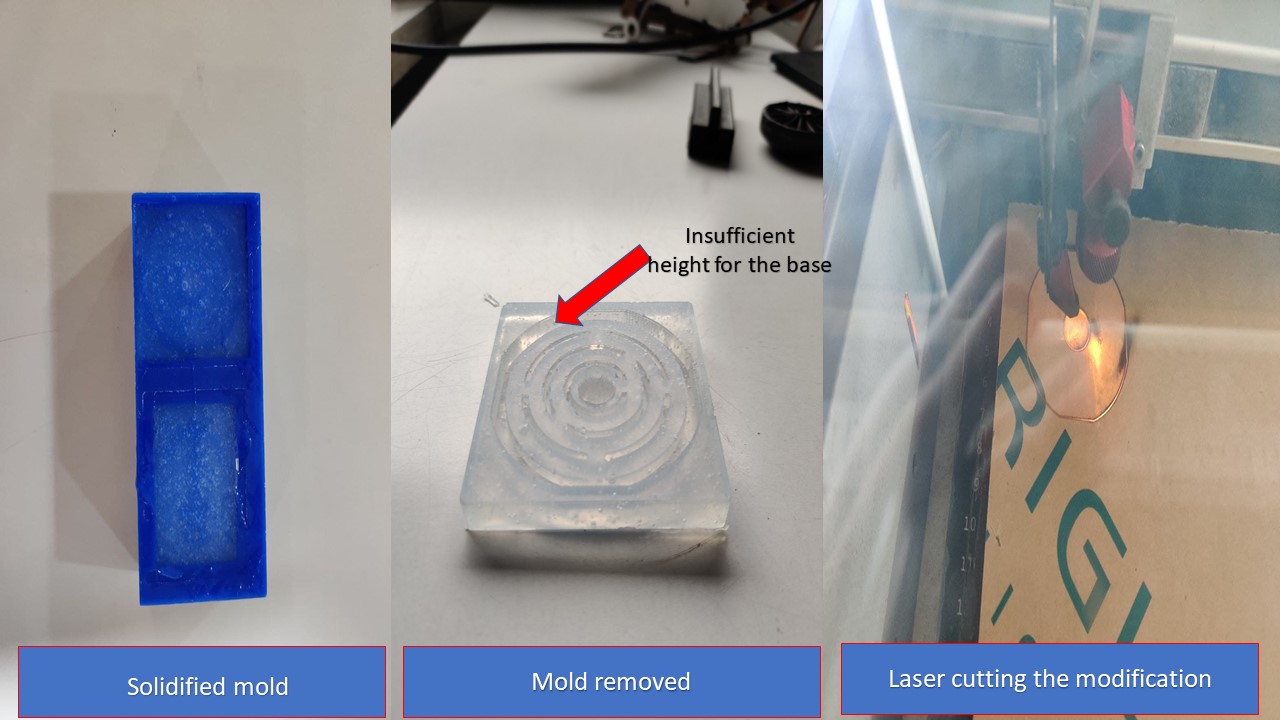
After repeating the mold making process for this modification, I had finally got the final negetive mold as expected.
Casting
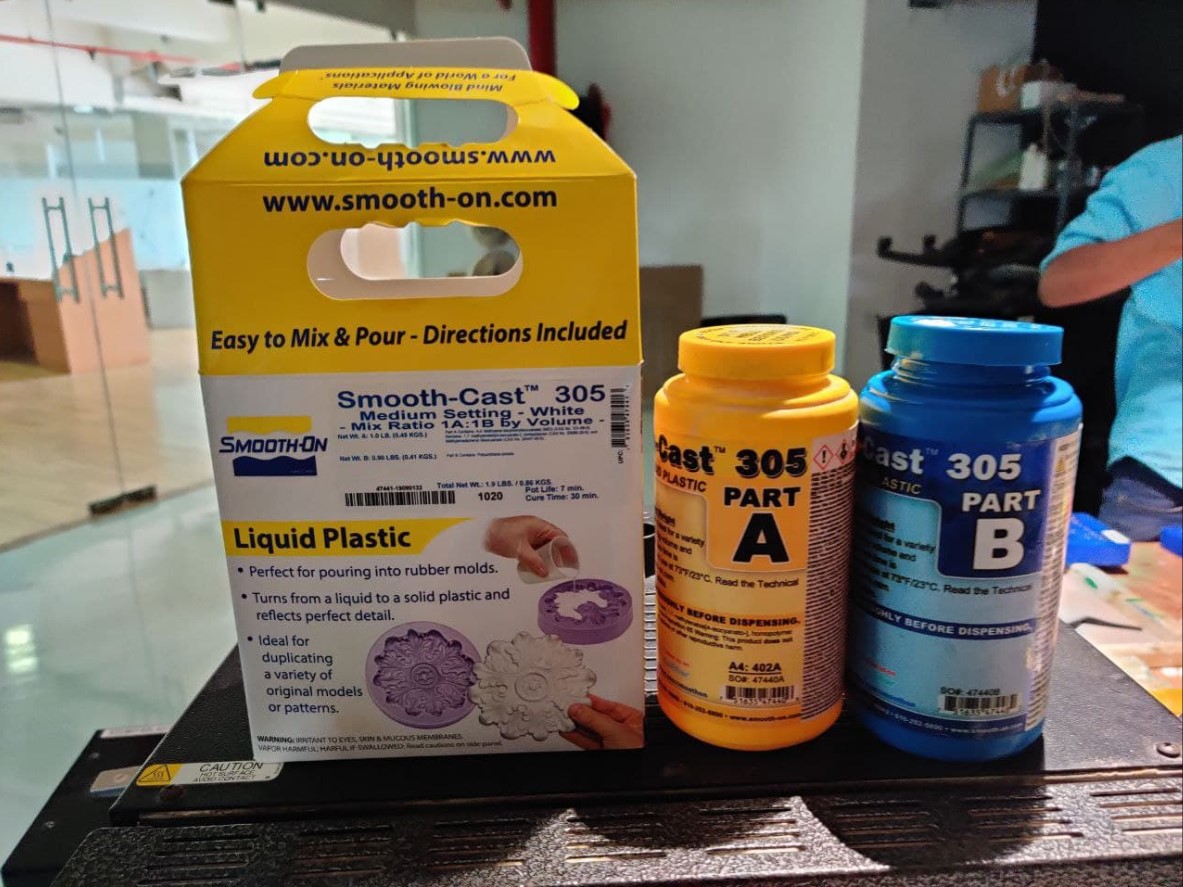
For casting I had used Smooth-On SMOOTH CAST 305 which is bright white liquid plastic. They are are ultra-low viscosity casting resins that yield castings that are bright white and virtually bubble free. Vacuum degassing is not necessary. They offer the convenience of a 1A:1B by volume or 100A:90B by weight mix ratio. The differences between them are pot life and demold time. These resins readily accept fillers (such as URE-FIL™ 3 from Smooth-On) and can be colored with SO-Strong™ or Ignite™ color tints (Smooth-Cast™ 325 series accepts pigments better than the Smooth Cast™ 300 series). Fully cured castings are tough, durable, machinable and paintable. They resist moisture and mild solvents. Applications for Smooth-Cast™ 300 Series Liquid Plastics include reproducing small to medium size sculptures, making prototype models, special effect props and decorative jewelry.
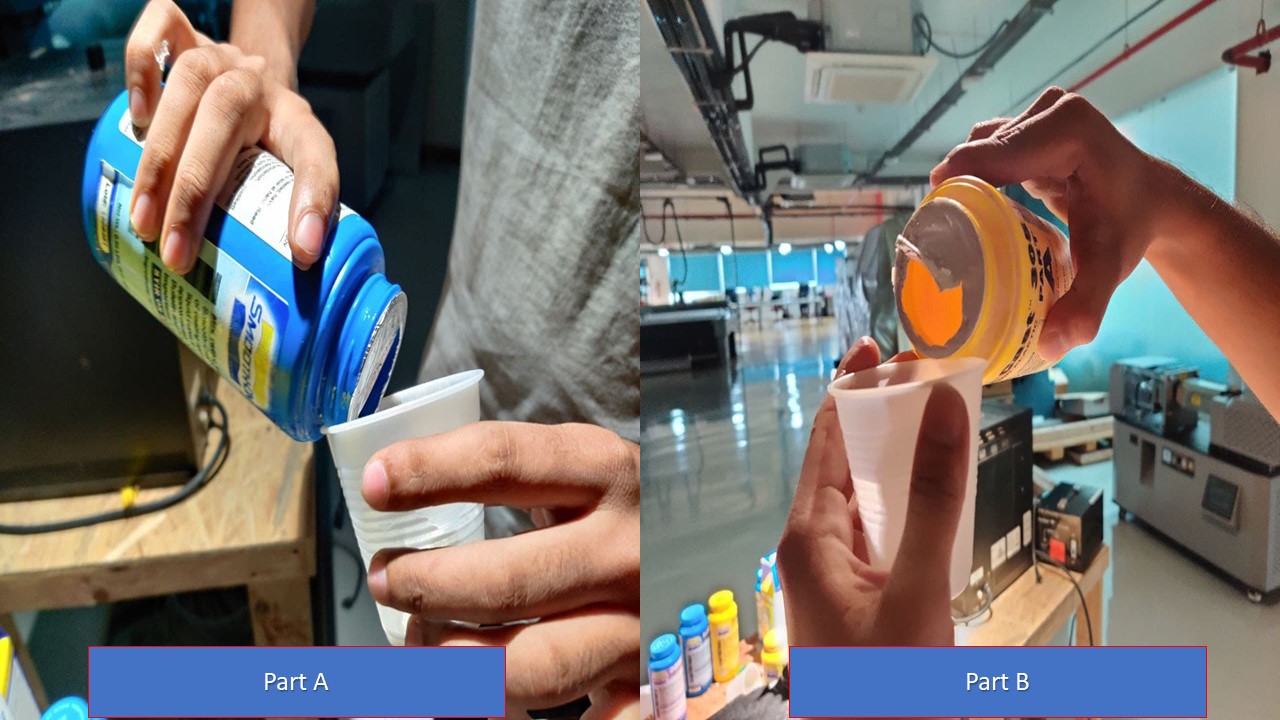
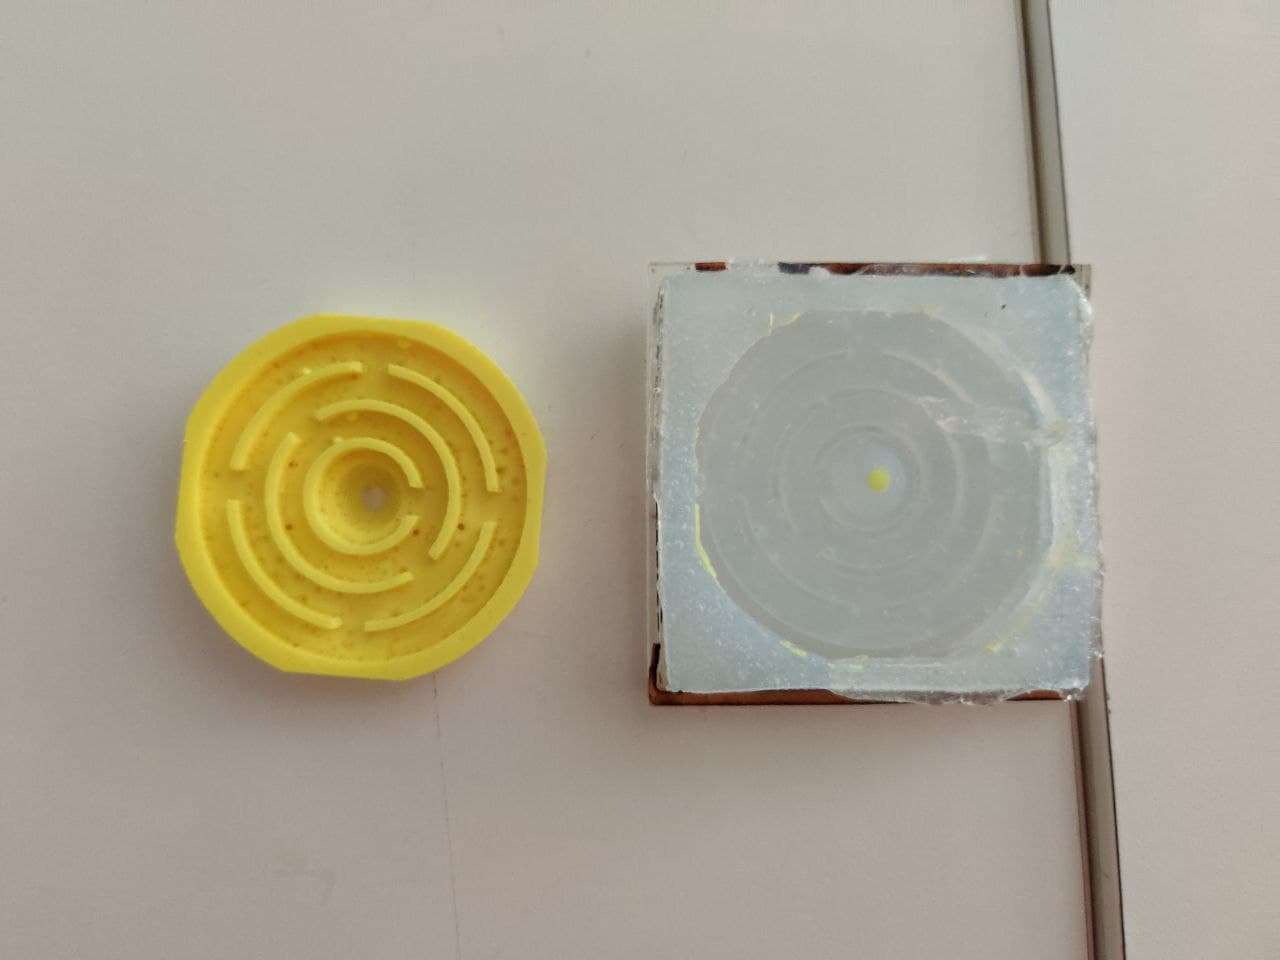
Both these Parts must be mixed in a specific quantity of 1A:1B by volume or 100A:90B by weight and cures at 73 degree F or 23 degree C in 30 min. I repeated the previous steps to create the mixture. Then I mixed the mixture thoroughly and poured it into the silicon mould.
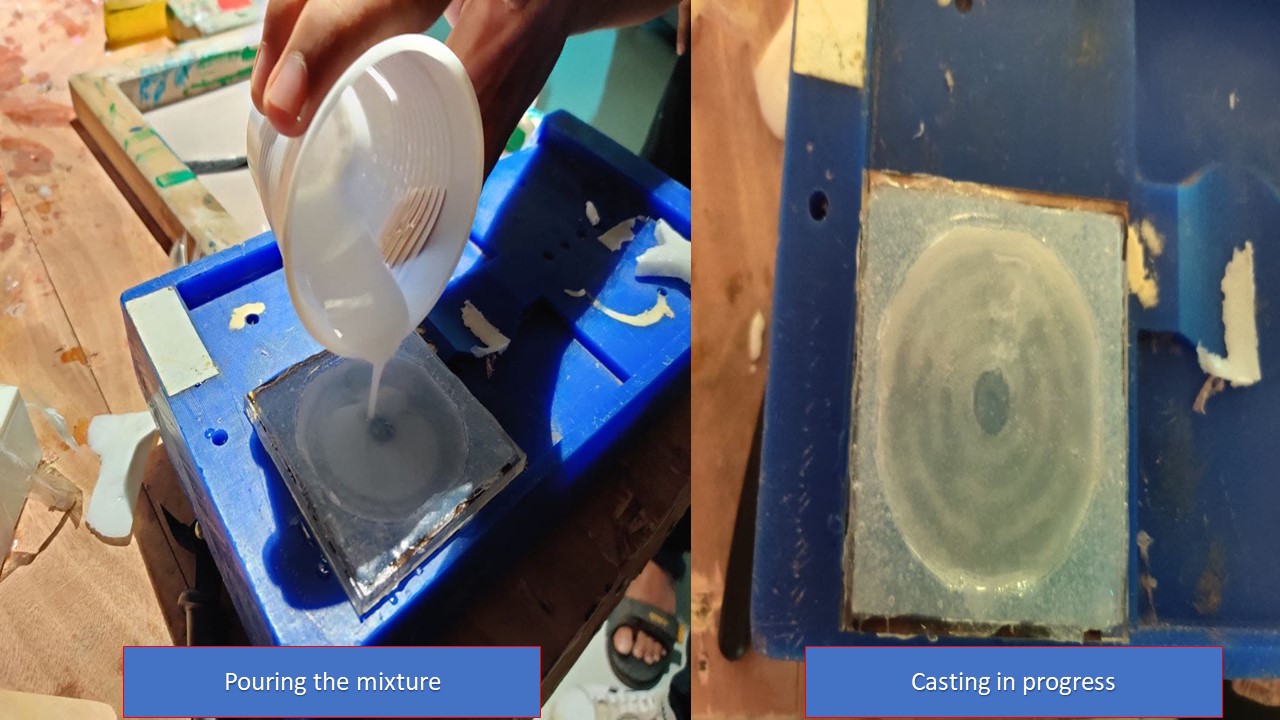
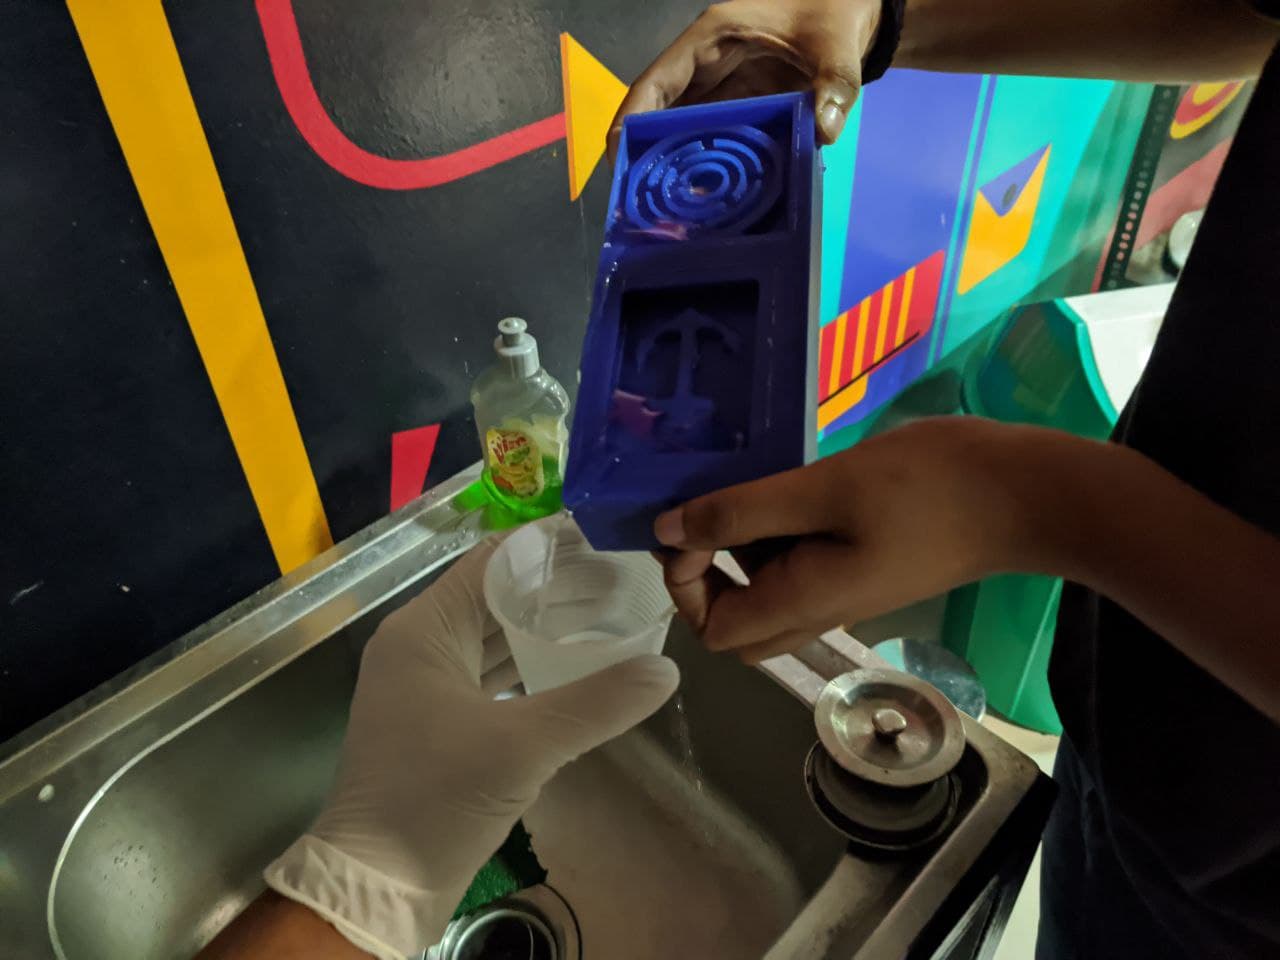
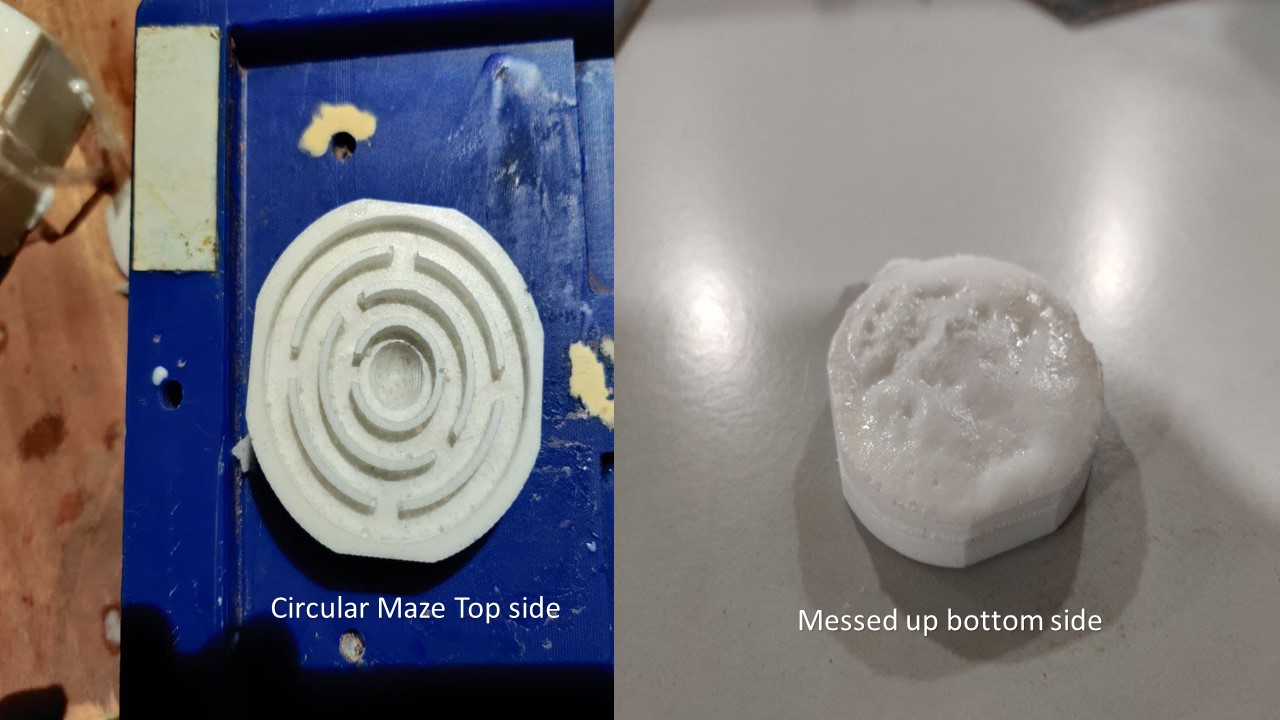
After a 1 hour long gap, I finally got my cast cured and I had manually removed the cast from silicon mold.
Since I poured excess mixuture to the silicon mould the bottom side got messed up but I will try to avoid it next time!
Casting using Smooth-On Yellow Pigment
The process of casting is similar to the previous one but the main difference is that you need to add colored pigment to the resin before mixing it with hardner. Do note that a small drop is enough to color the whole mixture. The rest of the process is similar to the previous method.
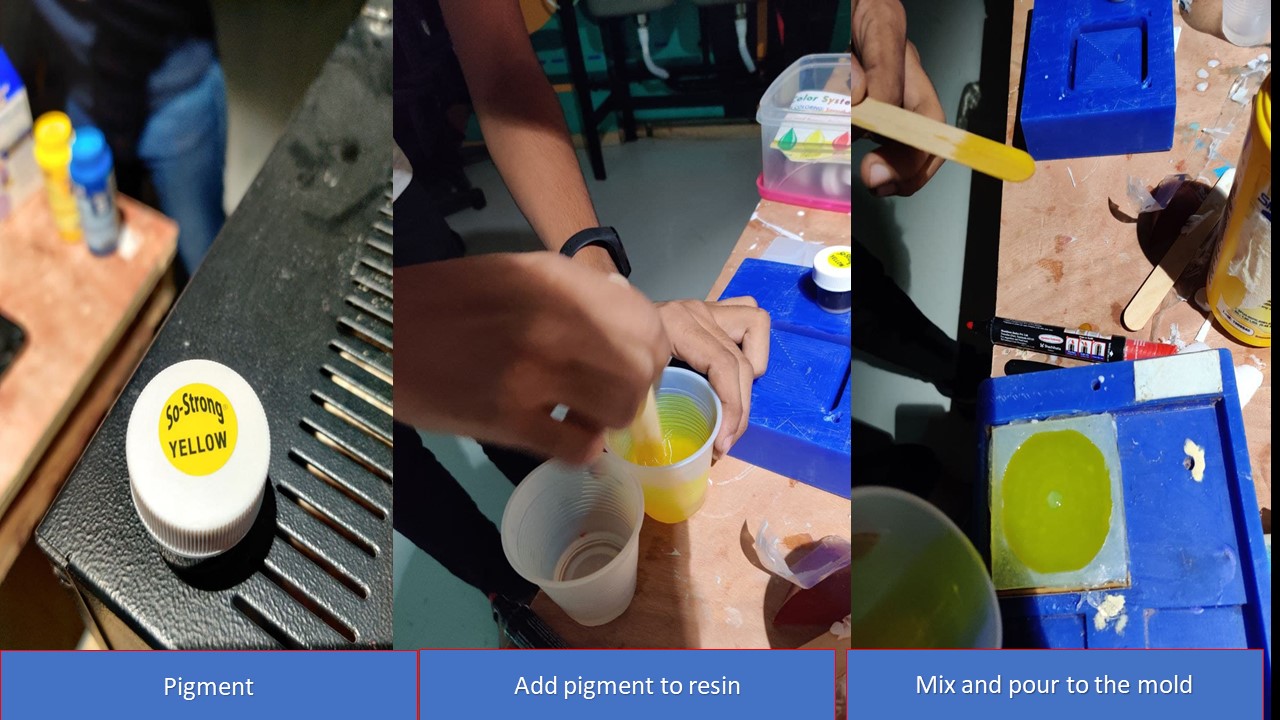
Hurray, I the yellow cast was successfully made!
This weeks Group Assignment is to review the safety data sheets for each of your molding and casting materials, then make and compare test casts with each of them.
Smooth Cast
The Smooth-Cast™ 300 Series of liquid plastics are ultra-low viscosity casting resins that yield castings that are bright white and virtually bubble free. Vacuum degassing is not necessary. They offer the convenience of a 1A:1B by volume or 100A:90B by weight mix ratio. The differences between them are pot life and demold time.
Instructions:
- Safety: Materials should be stored and used in a warm environment (73° F / 23° C). These products have a limited shelf life and should be used as soon as possible. All liquid urethanes are moisture sensitive and will absorb atmospheric moisture. Mixing tools and containers should be clean and made of metal, glass or plastic. Mixing should be done in a well-ventilated area. Wear safety glasses, long sleeves and rubber gloves to minimize contamination risk. Because no two applications are quite the same, a small test application to determine suitability for your project is recommended if performance of this material is in question.
- Applying A Release Agent : A release agent is necessary to facilitate demolding when casting into or over most surfaces. Use a release agent made specifically for mold making (Universal™ Mold Release or Mann’s Ease Release™ 200 available from Smooth-On or your Smooth-On distributor). A liberal coat of release agent should be applied onto all surfaces that will contact the plastic.
- Measuring & Mixing:Liquid urethanes are moisture sensitive and will absorb atmospheric moisture. Mixing tools and containers should be clean and made of metal, glass or plastic. Materials should be stored and used in a warm environment (73°F/23°C).
- Pouring: Pour your mixture in a single spot at the lowest point of the containment field and let the mixture seek its level. This will help minimize air entrapment.
- Inhalation: Remove source(s) of contamination and move victim to fresh air. If breathing has stopped, give artificial respiration, then oxygen if needed. Contact physician immediately.
- Ingestion: Do not induce vomiting unless instructed by a physician. Never give anything by mouth to an unconscious person.
- Eye Contact: Flush eyes with plenty of water. If irritation persists, seek medical attention. Skin Contact: In case of skin contact, wash thoroughly with soap and water.
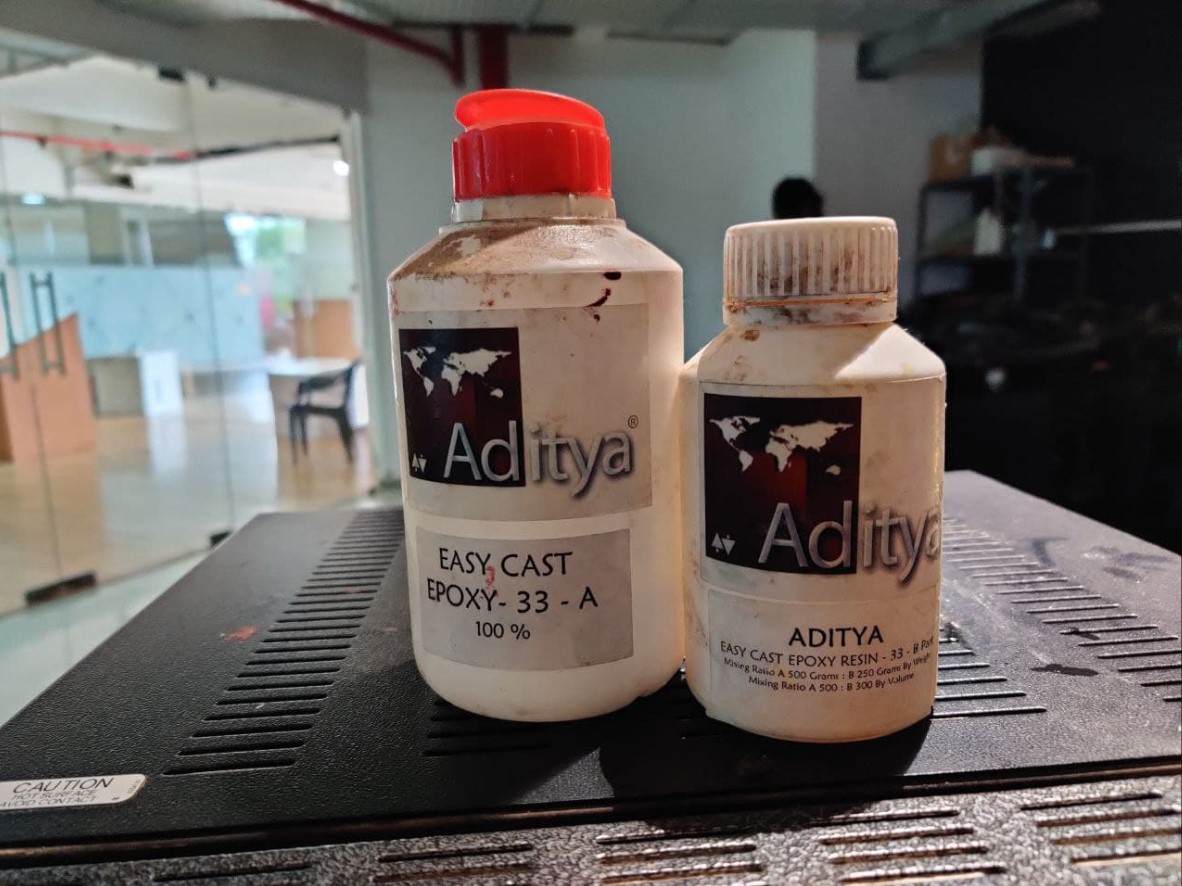
Aditya Easy Cast Transparent Epoxy Resin
Aditya Easy Cast Transparent Epoxy Resin - 33-750gm is very easy to use. Aditya Clear Cast Epoxy 33 can be casted into moulds of Silicone Rubber to Create Transparent Crafts, Lockets, Jewellery and Trophies. Pigments are available to make Opaque Colour Castings. It comes in Part A and Part B. Features include:
- Transparent
- It’s like water so flows into each and every corner of mould.
- Easy Part A 100 parts : Part B 50 parts mixing ratio.
- Non-Yellowing
Rules to follow during molding and casting
- Always make sure that the area you are using is not a closed one and there is proper ventilation according to room size standard
- Every material has its own health and safety guidelines. Please follow those. Some may be very harmful and may need special equipment. Please refer the datasheet.
- Use rubber gloves to minimize contamination risk. Wear vinyl gloves only. Latex gloves will inhibit the cure of the rubber. The thing is most of the mixing process involved is exothermic and you can use heat resistant gloves(if its a metal casting). Make sure you use the gloves where the chemicals can't enter your skin. Don't make any contact with the chemicals.
- Contact with skin and eyes may cause irritation. Flush eyes with water for 15 minutes and seek immediate medical attention. Remove from skin with waterless hand cleaner followed by soap and water.
- You can also use Safety glasses to avoid eye splashes during mixing and pouring.
- Never eat, drink, or smoke in work areas.
- Practice good personal hygiene after using this material, especially before eating, drinking, smoking, using the toilet, or applying cosmetics.
- Use mask so that the mix do not go your face.
- Maintain cleanliness where you work.
- Do not throw any mix or chemicals in the basin as it may clot the pipeline. If you have waste put it in a cut and let it settle or solidify and you an throw it later.
- Close all the lids after use as the chemicals may not be reusable if left it open in atmosphere.
- Keep the materials out of children's reach
We had two main materials for the mold in our lab for the silcone mold. One was oomoo and another was aditya. Aditya was from the local vendor which only mentioned the ratio of the mixture but not the pot pot time and the setting time. so we decided to use both to know about them and then use it to make a mold.
Sorta-Clear 37
SORTA-Clear 37 is a premium water white translucent silicone rubbers (platinum catalyst) which cure at room temperature with negligible shrinkage. These rubbers feature high tensile and tear strength. They offer the convenience of a 1A:1B by volume mix ratio. They are ideal for making prototype, jewelry or other molds of any configuration where model visibility is important (i.e. extracting a model from the mold via cutting). Materials such as urethane, epoxy or polyester resins can then be cast into these silicone without application of a release agent. Other materials such as wax and low melt metal alloys can also be cast into the mold made out from this rubber. These can be pigmented with SILC Pig™ silicone pigments. They are also FOOD SAFE and can be used for culinary applications including casting chocolate and other confections.
Testing
Since the SortA-Clear 37 which we had been using was old, there were bubbles already in the rubber before mixing. First we decided to save time for understanding the process safety and the quality of the mold so used the old milled was for molding. Main thing first, since the mix has a pot life of 25 min, keep everything ready on the table so that the process goes uninterrupted, wear your safety gears like gloves, masks, and glasses. First trying the SortA-Clear 37, it had the ratio of 1:1 by volume and 100:139 for part A : Part B. There are 3 ways three ways to mix Part A and Part B.
- Pour a volume of Part A and same volume of Part B and mix it
- Pour a weight of Part A and pour Part B of 1.3 times the weight of Part B
In our case, we used the second one, mix by weight, but took reference of amount of material by volume. To estimate the amount we should be mixing, the volume of the mix has to be known so as to prepare it so take a cup, translucent or transparent, pour water into the milled part , pour the water into the cup, mark the total volume and mark half the volume. Now put the cup on the weighing scale set the weight to zero with the cup (In case you cant set zero the weight with cut, please consider the weight of the cup and use the difference for calculation). Pour Part A up till half mark we made on the cup or a little bit more for being safe of amount of mix. Weigh it and add Part B by weight ratio of 100:130 (A:B), i.e if the weight of Part A is "x" gm "1.3*x gm" of Part B should be poured. Then mix it with only horizontal strokes, not vertical strokes or it might add the air bubbles into the mix. Less the air bubble, better your mold will be.slow mix has to be done so that the air bubble do not form. You might use vacuum chamber to remove the air bubbles if you have it in your lab. We did not have it in our lab so we were unable to use it. If the bubble comes in the surface where the material is cased, you might have defect in your mold and the part which will be cast out of that mold. Remember that the pot life of the mix is just 25 minute of do not let the mix stay for more than that. It might be different for your material which should be mentioned in the datasheet.

After the mixing was done, pour it slowly from one end of the mold letting it flow smoothly. The trick according to our instructor was to pour it slowly stretching the flow so that if there is any bubble in the mix, it will go out during the stretch. After the mix was poured onto the wax, we shook it so that the mix gets into all corners and if in case if there is any bubble trapped, it might come up to the surface. The mix has the cure time of 4 hrs, so at least leave it for 4 hrs untouched. For us we left it overnight as we did it in the evening. After it is cured, the mold can be ejected easily as it is rubber and can stretch. Same was done from the aditya silicon with the ratio of 30-14gm hardner per 1Kg rubber. It was poured into another mold but did not cure even it was left for one and half day. so we rejected that.